Action Tokens
Manage your logistics in the field quickly by using Action Tokens, without having to login into the MDM for each operation.
Permissions
The following list includes all permissions tied to this MDM section and the impacts they have on the MDM interface or the MDM API.
You can pick and choose these permissions when creating a new Custom Role or MDM API token.
Permission category - "Action Tokens"
Read (fms.actiontoken.read)
- What it does: Allows users to access the existing Action Tokens.
- Where it applies: Action Tokens page and API endpoint.
- What happens without this permission: The Action Tokens page and API endpoint can’t be accessed.
Create (fms.actiontoken.create)
- What it does: Allows users to create new Action Tokens.
- Where it applies: Action Tokens page and API endpoint.
- What happens without this permission: The buttons to create new Access Tokens are not visible and it is impossible to create new Action Tokens through the API endpoint.
Delete (fms.actiontoken.delete)
- What it does: Allows users to delete existing Action Tokens.
- Where it applies: Action Tokens page and API endpoint.
- What happens without this permission: The buttons to delete Actions Tokens are not visible, and it is impossible to delete existing Action Tokens.
Feature Presentation Video
What can I do with Action Tokens?
Action Tokens can trigger 4 possible actions:
- Put in Fleet: this action triggers a device move from its current fleet to another existing one
- Put in Repair: this action triggers a device move from its current configuration to the "In repair" state
- Put in Stock: this action triggers a device move from its current configuration to the "In stock" state
- Reset device certificate: this action clears the certificate of the device on the MDM, in case it is no longer able to synchronize with the MDM
Warning
Clearing a device's certificate should only happen if you have factory reset your device due to a malfunction, in order to restore secure communication with the MDM. It should not be a common action.
Adding new Action Tokens
Pressing the "+ New" button allows you to create a new token.
- Name your token in order to manage your multiple tokens
- Select the type of action the token will do (see above)
- Select an expiration date for the token, after which it will no longer function (good for time-sensitive operations in the field)
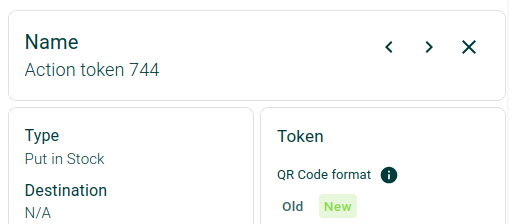
Formats
There are two QR Code formats for action tokens: a new one and an old one. They are both accessible when you click on an action token on the data table, and its side panel opens. You can toggle between them by clicking their format name. Each format is valid on a range of Famoco Layer versions (see subsection below).
Each Action Token has a unique code and is only compatible with devices in your organization.
Using Action Tokens
Please check the following Famoco Layer docs page for more information about how to use these Action Tokens, depending on the version of the Famoco Layer you have on your device.