Membership
Manage your users and their permissions on the Membership menu.
Members tab
From this tab, you are able to invite users to your MDM organization, and assign them a role within it. You are also able to revoke access, if you so desire.
Permissions
The following list includes all permissions tied to this MDM section and the impacts they have on the MDM interface or the MDM API.
You can pick and choose these permissions when creating a new Custom Role or MDM API token.
Permission category - "Membership"
Read (fms.membership.read)
- What it does: Allows users to:
- Access the Members and Roles pages
- See and add members when creating a new Insights Dashboard
- Where it applies:
- Members page (/membership)
- Roles page (/membership/roles)
- Insights Dashboards page (/insights/dashboards)
- What happens without this permission:
- The Members and Roles pages can’t be accessed.
- The members are not visible when creating a new Insights Dashboard.
Create (fms.membership.create)
- What it does: Allows users to create Members.
Note that the following permission is required in order to be able to create Members:
fms.membershiprole.read
- Where it applies: Membership - Members page (/membership).
- What happens without this permission: The buttons to create Members are not visible.
Update (fms.membership.update)
- What it does: Allows users to edit Members.
Note that the following permission is also required to be able to edit Members:
fms.membershiprole.read
- Where it applies: Membership - Members page (/membership).
- What happens without this permission: The buttons to edit Members are not visible.
Delete (fms.membership.delete)
- What it does: Allows users to delete Members.
- Where it applies: Membership - Members page (/membership).
- What happens without this permission: The buttons to delete Members are not visible.
Roles tab
Roles are a set of permissions a user has inside of your MDM organization. Famoco provides four default roles, with different sets of permissions (which can be consulted when selecting the role and reading the side-panel which opens):
- Admin
- Device Manager
- Fleet Manager
- Observer
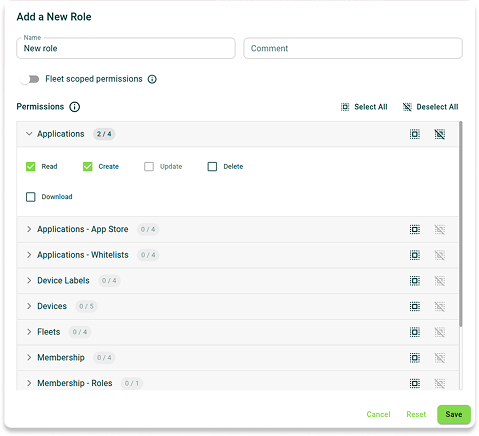
If you require more refined sets of permissions, you may create your own Custom Roles by pressing the "+ New" button and selecting permissions per section. These roles will then be assignable to users in the Members tab.
Permissions
The following list includes all permissions tied to this MDM section and the impacts they have on the MDM interface or the MDM API.
You can pick and choose these permissions when creating a new Custom Role or MDM API token.
Permission category - "Membership - Roles"
Read (fms.membershiprole.read)
- What it does:
- Access the Membership - Roles page
- Create and update a Member (along with the required permissions, see the Membership section)
- Where it applies:
- Membership - Members page (/membership)
- Membership - Roles page (/membership/roles)
- What happens without this permission:
- The Membership - Roles page is not accessible.
- The buttons to create and edit Members in the Membership - Members page are not visible.
Create (fms.membershiprole.create)
- What it does: Allows users to create Roles.
- Where it applies: Membership - Roles page (/membership/roles).
- What happens without this permission: The buttons to create Roles are not visible.
Update (fms.membershiprole.update)
- What it does: Allows users to edit Roles.
- Where it applies: Membership - Roles page (/membership/roles).
- What happens without this permission: The buttons to edit Roles are not visible.
Delete (fms.membershiprole.delete)
- What it does: Allows users to delete Roles.
- Where it applies: Membership - Roles page (/membership/roles).
- What happens without this permission: The buttons to delete Roles are not visible.
Understanding permissions in the MDM
Each MDM page listed on this Help Website (see the quick start page for the full list), including this one (see above), has one or more "Permissions" call-outs (see example below), which when clicked on allow you to understand the impact of each permission found in the Custom Roles creation form.
Example:
Permissions (CLICK ME)
Some text explaining the permissions for the section you are reading.