Devices
The Devices menu is one of the most important ones in the MDM, as it is where you get all the information about your devices, where most of the logistics happen, and where you can take action to help users in the field.
Device Actions
Permissions
The following list includes all permissions tied to this MDM section and the impacts they have on the MDM interface or the MDM API.
You can pick and choose these permissions when creating a new Custom Role or MDM API token.
Permission category - "Devices"
Read (fms.device.read)
- What it does:
- Access dashboard page (/)
- Access devices page (/devices)
- Access maps page (/map)
- Where it applies:
- Dashboard page (/)
- Devices page (/devices)
- Maps page (/map)
- What happens without this permission: The Dashboard, Devices and Devices Map pages can’t be accessed.
Update (fms.device.update)
- What it does:
- Allow users to put devices in stock.
- Allow users to put devices in repair.
- Allow users to change devices fleet (with the action put in fleet in devices table).
- Allows users to have access to the Manage Labels creation tool.
- Allows users to have access to the edit action and edit form to edit a device.
Refer to Device Labels permissions.
- Where it applies: Devices page (/devices)
- What happens without this permission:
-
The following actions are not available:
- Put in stock
- Put in repair
- Put in fleet
- The Manage Label tools is not available
- The edit actions and edit form are not available
-
The following actions are not available:
Put In Organization (fms.device.putinorganization)
- What it does: Allows users to put a set of devices in an organization.
- Where it applies: Devices page (/devices).
- What happens without this permission: The action button to put a set of devices in an organization is not visible.
Reboot Now (fms.device.rebootnow)
- What it does: Allows users to have access to the Reboot Now action.
- Where it applies: Devices page (/devices).
- What happens without this permission: The Reboot Now action is not available.
Remote Control Session (fms.device.remotecontrolsession)
- What it does: Allows users to have access to the Remote Control action.
- Where it applies: Devices page (/devices).
- What happens without this permission: The Remote Control action is not available.
Sync Now (fms.device.syncnow)
- What it does: Allows users to have access to the Sync Now action.
- Where it applies: Devices page (/devices).
- What happens without this permission: The Sync Now action is not available.
Lock / Unlock (fms.device.togglelock)
- What it does: Allows users to have access to the Lock and Unlock devices action.
- Where it applies: Devices page (/devices).
- What happens without this permission: The Lock and Unlock actions are not available.
Update Comment (fms.device.update:comment)
- What it does: Allows users to edit the Device Note (comment) of a device.
- Note that the following permission is also required in order to update the device note:
fms.device.update. - Where it applies: Devices page (/devices).
- What happens without this permission: The Device Note field is not visible when editing a device.
Once you select one or more devices, by pressing their corresponding checkboxes, an action toolbox will appear at the bottom of the table.

Additionally, when you click on the row of a single device, its side-panel will open and the same actions for that specific device will be available.

We provide below a list of all possible actions you may take.
Device notes and Custom Identification
These features will be available if you select just one device and press the button.
Depending on the version of the Famoco Layer you have, or the Profile settings attached to this device, you will have one or two features available:
Device notes allows you to add a comment on this device, which can be seen later by yourself or your other users on the MDM on the table by highlighting the icon (it is also searchable with a filter above the table).
The Custom identification feature can be used in two different ways, depending on the setting you set on the device's Profile:
- if you selected MDM Controlled, the identification happens on the MDM (example: if you have a personal logistical system that encodes your assets with IDs specific to your system, i.e. different from our Famoco IDs, you may use the custom identification feature to tag devices with that ID, which is later searchable with filters on the Devices' table)
- if you selected Device Controlled, the identification happens on the Device's side (example: a user writes their name on the device at the start of their shift in order for you to know who is using it at the moment). The Famoco Layer docs explain how to set this ID from the device's Dashboard.
Logistics
Decide which devices go in the field or not with the logistical actions.
: put the device "In Stock", which will remove all its configuration settings
: put the device "In Repair" (same as above, but for devices which you want to differentiate as faulty)
: select which Fleet the devices are linked to, and by extension which Profile configuration they will have
: if you have access to multiple MDM Organizations, this button will be displayed and you are able to move devices across organizations
Lifecycle
Some of these features allow you to control the lifecycle of devices to support and troubleshoot issues in the field. They require fairly recent devices and Famoco Layer versions, please update them to access these features.
: forces the device to sync right now (if it is connected to the internet)
: forces the device to reboot right now (if it is connected to the internet)
: forces the device to reboot at next sync with the MDM
: forces the device to lock itself and not allow users to access applications (either right now if the device is connected to the internet, or at next sync with the MDM when its connection is restored)
: forces the device to unlock itself (either right now if the device is connected to the internet, or at next sync with the MDM when its connection is restored)
Labels
Labels adds an extra layer of logistics to your devices by adding metadata to them. They are searchable with filters and are displayed on the Data Table with small circles with colors you pick, in order to recognise them very fast.
Permissions
The following list includes all permissions tied to this MDM section and the impacts they have on the MDM interface or the MDM API.
You can pick and choose these permissions when creating a new Custom Role or MDM API token.
Permission category - "Device Labels"
Read (fms.devicelabel.read)
- What it does:
- Allows users to see existing Device Labels in various places on the devices page.
- Allows users to access the Device Labels creation tool.
Note that the following permissions are required in order to access the Device Labels tool:
- fms.devices.update
- fms.devicelabel.update
- Where it applies: Devices page (/devices)
- What happens without this permission:
- None of the existing Device Labels can be seen on the devices page
- The Device Labels creation tool is not available
Create (fms.devicelabel.create)
- What it does: Allows users to create Device Labels via the Device Labels creation tool.
Note that the following permissions are required in order to access the Device Labels creation tool:
- fms.devices.update
- fms.devicelabel.read
- fms.devicelabel.update
- Where it applies: Devices page (/devices)
- What happens without this permission:
- Buttons to create Device Labels are not visible.
- The Devices Labels creation tool is not available.
Update (fms.devicelabel.update)
- What it does: Allows users to edit Device Labels via the Device Labels creation tool.
Note that the following permissions are required in order to access the Device Labels creation tool:
- fms.devices.update
- fms.devicelabel.read
- Where it applies: Devices page (/devices)
- What happens without this permission:
- Buttons to update Device Labels are not visible.
- The Devices Labels creation tool is not available.
Delete (fms.devicelabel.delete)
- What it does: Allows users to delete Device Labels via the Devices Labels creation tool.
Note that the following permissions are required in order to access the Device Labels creation tool:
- fms.devices.update
- fms.devicelabel.read
- fms.devicelabel.update
- Where it applies: Devices page (/devices)
- What happens without this permission:
- Buttons to delete Device Labels are not visible.
- The Devices Labels creation tool is not available.
Creating labels
Manage your Labels by accessing the "Manage Labels" action at the top of the menu, above the Data Table.
Adding labels to Devices
The icon on the Action Toolbox allows you to add or remove labels to the current device selection.
Device side panel
If you click on the row of a device on the table, the device's side panel will open. On it, you will find a digest of important information about the device.
If you want to go more into detail about a certain device device, pressing
 on its side-panel allows you to display a lot more information about it, and apply some actions on the fly.
Device information
Here is a condensed list of all the information and actions you can find about the device on its side panel:
- Its Profile, Fleet, device mode, and lock status (see above)
- Synchronization information (sync frequency, sync status, heartbeat, and sync audit logs)
- Application information (list of installed apps)
- Device Information (warranty, battery status at last sync, IMEI, Model, OS/Famoco Layer versions, Software update status)
- Connectivity information (wi-fi status, mobile data status, NFC status, Bluetooth status, location status, SIM lock status, SIM state)
- Labels (see above)
- Location information (last known location + Geofence if you set one)
- Buttons to trigger Remote Control on the device (check our Remote Control Guide for more information)
- Button to send a message to the device directly
- If you have subscribed to Famoco Connect, consumption data about this specific device
- If you have subscribed to Insights Paid MDM Add-On, a small digest of information about this specific device
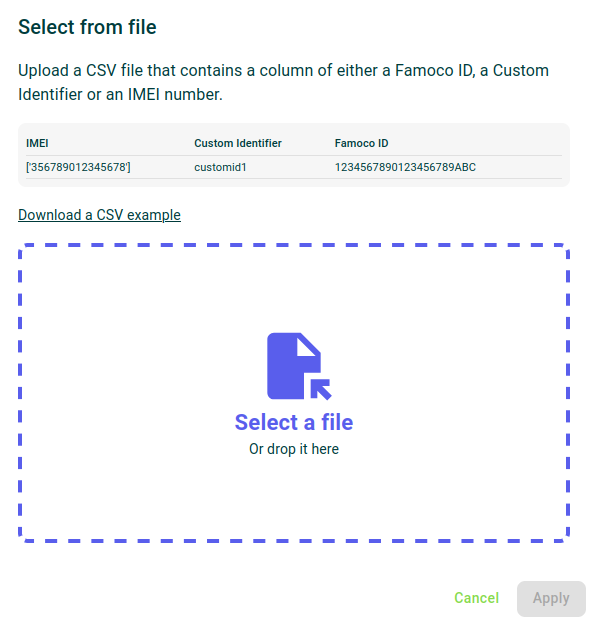
Select from file
To apply actions to your devices, you need to select them beforehand. This might be quite complicated if you want to apply actions to a big amount of devices, especially if your selection of devices comes from one of your systems, outside of Famoco's control.
Thanks to our select from file feature, accessible by pressing the icon above the table, you can upload a CSV file giving either a list of Famoco IDs, Custom IDs, or IMEIs. If the information is valid, the devices will be selected in the Device table, and you will be able to apply actions to that selection.